How to Use Fabric with Heat Bond Adhesive for a Heat Transfer Vinyl Design

Hey Rozzy Crafters! Have you every wanted a pattern for your design but couldn’t find it or didn’t want to spend the extra money for patterned vinyl? This is a tutorial on how you can create patterns for your vinyl designs using heat bonded fabric. This method is SO MUCH cheaper than paying for patterned vinyl that can be $5-$10 per 12”x10” sheet.
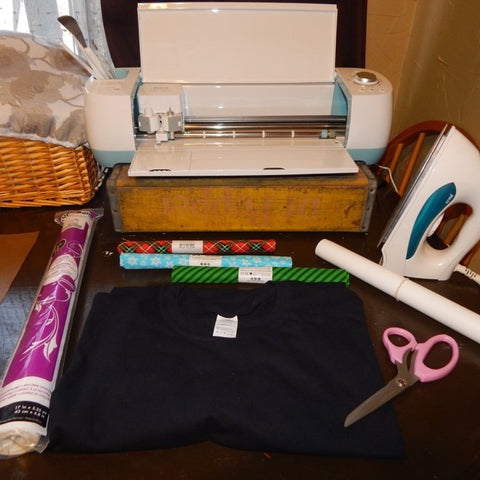
SUPPLIES NEEDED:
- T-shirt
- Heat transfer vinyl
- Heat’n’Bond iron on adhesive
- Patterned fabric (100% cotton works best)
- Cricut, Silhouette, or other cutting machine
- Design software (This tutorial uses Cricut Design Space)
- Iron or heat press
- Scissors
STEP 1: DESIGNING
This method works best with bold letters and large designs. Fine details/cuts can cause the fabric to rip or the design to be cut incorrectly. However, the variety of possible designs is numerous! I picked up some Christmas patterned fabric at my local store for $0.97, they were 18”x21” pieces. SO MUCH cheaper than paying for patterned vinyl that can be $5-$10 per 12”x10” sheet.
Next, I picked a design for my t-shirt. The shape or letter you are using should have an outline. The outline is created with heat transfer vinyl and placed on top of the bonded fabric to help with adherence and to prevent fraying of the fabric’s edges over time. Here’s how you easily create an outline for fonts:
Filter your fonts to only include multi-layered fonts, this will give you fonts that have a background layer built-in. You will need this to create the outline.

The background layer will be automatically hidden.

You want to select the crossed out “eye” so that the background layer becomes visible.
BEFORE

AFTER

Next, select the text and slice it. This will give you three new layers. The original layer, an outline, and the background layer (which will now be the same size as the original layer). Sounds confusing, but you can easily see below the new layers. The outline, the grey (which was the original text layer), and the black (which was the background layer that we made visible).


You can delete the original background layer. You will then be left with the text and an outline for the text. You can then resize your text/outline and create the rest of your design. Create a final mock-up to verify the layout of the design.

Ungroup the outlines from one another so that they can be layered on the shirt individually.
Make sure that you write down the order that your layers should be pressed. This will help when you apply the design.
STEP 2: PREPPING YOUR FABRIC TO BE CUT
Begin by cutting your fabric and your Heat ’n’ Bond to the desired size. You can figure this out by clicking the Make It button so that you can see the size of the design that will be on the mat.


For this design, I will need a 4.5” x 11.5” rectangle of the patterned fabric. Always give yourself a little extra room for measurement errors. It is easy to be off by a ¼ of an inch, so I typically add ½ an inch to both the width and height.


Set your iron to the cotton setting without steam or your press to 315 degrees. Iron or press your fabric to remove any moisture and to flatten it completely. In the above picture you can see that my fabric was curling on the edges due to being packaged in a roll. Then, place the adhesive on the back of your fabric with the paper back facing up.

Place and hold the iron or press on top of the paper liner and hold for 2 seconds. Pick up iron or press and move to next section of fabric. Repeat until entire surface is bonded.

STEP 3: CUTTING OUT YOUR DESIGN
First, remove the paper backing from your bonded fabric, it is no longer needed. The adhesive on the back of the fabric is only activated by heat, so it is not sticky at any other time unless being ironed. No need to worry about it picking up any pesky dirt, dust, or hair like some adhesives will while waiting to be pressed. In fact, the paper backing will get in your way when removing your bonded fabric from your mat and can become stuck to the mat (only experience can teach this lesson).

Set your Cricut to the “Bonded Fabric” dial setting and load your mat into your machine. Press the flashing Cricut button to begin the cut.


Once the cut has completed, unload your mat and carefully remove the excess bonded fabric. You will be left with just your bonded letters.

Next, cut the rest of your design. The rest of my design was done with heat transfer vinyl in matte and glitter colors. Make sure your heat transfer vinyl has the correct side facing up by using your weeding tool on the corner of your vinyl. Poke a small hole and stretch it to make sure that the vinyl side is facing up and the carrier sheet side is facing down. If you cannot easily poke a hole and slightly stretch the vinyl, flip it to the other side and try again.

All other parts of your design should be mirrored as you normally would with heat transfer vinyl. Weed the other parts of your design

STEP 4: APPLICATION
When you have all of your pieces of your design cut out and weeded, you are ready for application. Make sure to center your design and prep your fabric by folding your t-shirt in half and pressing or ironing. This will create a crease in the center of the shirt and remove any moisture (this can interfere with the adherence of both the bonded fabric and the heat transfer vinyl.

Start building your design by pressing your layers. Follow the order of layering that you wrote down when you were designing (told you that would come in handy).
The bonded fabric layer only needs to be pressed for 6 seconds.

The outline layer should follow the bonded fabric layer. Carefully place your outline around your letters. You can add the outline in pieces to make it easier.

Then add any additional layers.

Make sure to do one final press after all layers have been added. The texture of your fabric should be visible on your heat transfer vinyl. This is the sign that your heat transfer vinyl has been fully adhered.
CONCLUSION
Bonded fabric is the perfect way to use patterns in your vinyl designs without having to spare the extra cost of using patterned heat transfer vinyl or the added stress of trying to find the perfect pattern. So the next time you are looking to add patterns to your designs, try using fabric with heat bonded adhesive!
If you have any questions or suggestions, let us know in the comments below or on Facebook!
Hi! I’m trying to do something similar to this, but I would like the outline to slightly overlap the fabric inside (to protect the fabric and make sure it’s adhered well/ edges of the fabric letter don’t peel up) – do you know a way to do this?
Leave a comment